It’s time!
Bale Gardening Lesson #1!
Time to get our growing medium started, since it will have to be ready by May, or soon after the frosts stop.
Time to call the person you’ve decided on purchasing bales (hay or straw) from and get them delivered. Arrange them into position and start letting the weather do its thing. Rain, snow, frost, it’s all good, and will help in the decomposition process of the bales.
If they are not getting enough moisture, then hose them down liberally with water at least 2 times a week. Water, temperature changes, and sun will start those bales cooking… literally. After about a month of them being outside, stick your hand into the middle of a bale and feel the heat that is created through the composting process. Keep doing this at least once a week for the following weeks until they start to cool again (which means you won’t cook the roots of the seedlings that you will plant).
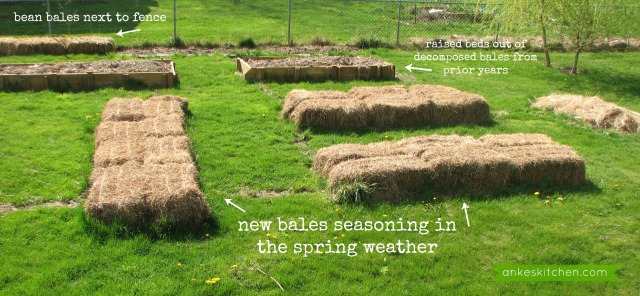
Where should the bales be placed?
In the sun! The beauty of bale gardening, other than that you are avoiding mega amounts of work since you won’t be doing any tilling, hoeing, weeding, mixing compost, re-tilling and re-hoeing and re-weeding… is that they can be placed ANYWHERE that is in the sun, and has access to water. Gardens, driveways, rooftops, backs-of-the-shed, balconies, houseboats, … get the idea?

Along a fence is always great because one can use the fence itself as a support system. That’s where we like to plant our climbing string beans.

If the sun only shines on a narrow driveway, utilize it!

Just remember that you need to be able to access them relatively easily in order to water them, and later to collect your bounty when it is ready.
It really is as easy as it sounds, but you must be dedicated and see it through until the end because with regular rain and/or watering (but no hard labor), you will get so many vegetables that you will have to decide what to do with all the veggies you won’t be able to eat in time. I have been getting into canning in a big way, but freezing is also a good option. You just have to be there to water them and harvest regularly in order to encourage more growth. Easy peasy gardening!

If you place your bales on grassy lawn, as we have, you must create a barrier between the lawn and the bales so that the grass does not keep growing up through the bales. We have found that the best barrier is cardboard as it will also decompose over the summer and leave you with a nice grass-less patch of soil that can either be re-used for bales the following year, or tilled and worked for more root vegetables using old bales from prior years (more about that later).
In our next lesson I will write about what grows well in bales according to our own experiences and which plants can be started directly from the seed, and which are better off planted as seedlings; especially in regions where the growing season is not very long.
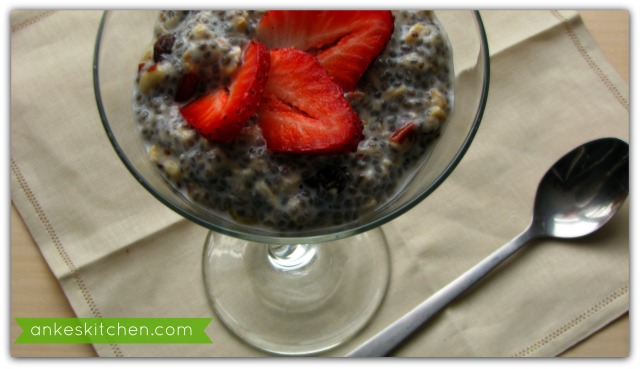
In the meantime, have some muesli. Oats should be cooked, or soaked, for better digestion and blending them with chia seeds adds extra nutrition and a pudding like texture. Vanilla and raisins sweeten this treat without any other added sugars. Eating small servings of this instead of heavy sweets helps ease the sugar cravings during dieting regimes… and it tastes so good! Muesli is made ahead of time so one week’s worth of breakfasts can be made in the time it takes to pound, or process, some nuts.

Vanilla Chia Muesli
makes 4 – 6 servings

4 cups milk of your choice (dairy, soy, almond, coconut, etc)
1 cup of oats
1/2 cup chia seeds
1/3 cup pounded hazelnuts
1/3 cup pounded almonds
1/4 coconut flakes
1/2 cup raisins
1 teaspoon vanilla
fresh fruit slices
Blend the milk, oats, chia seeds, raisins, and coconut flakes in a bowl. With a mortar and pestle pound the hazelnuts and almonds until only a few larger chunks are left. I prefer the texture of nuts in muesli with this method because some of the more finely pounded nut pieces blend better with the muesli and the chia seeds, increasing their flavor and the overall texture.
Blend the pounded nuts with the oat/chia mix along with the vanilla.

Cover and place in the refrigerator overnight, or at least 5 hours. The chia seeds will absorb much of the liquid creating a uniquely creamy/crunchy texture, and the vanilla and raisins will add just the right amount of sweetness.
Serve with fresh fruit slices of your choice.

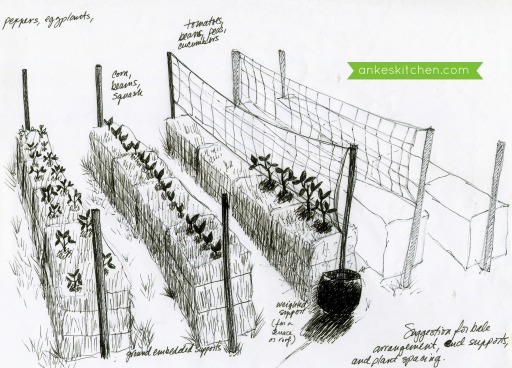
Lovely illustrations Anke, did you do them?
I’ve been wanting to bale garden for months and the mild winters here are perfect for winter bale gardening but, d’you know what? straw bales are as rare as rocking horse shit here. Even though wheat is grown just a few miles down the road on the mainland and there’s sheep, goats, cows and horses in the fields, the farmers seems to jealously guard their stash. After asking around it seems I have to wait till the next harvest (june) to catch the guys who sit in their lorries piled high with straw waiting for customers to haul it away in their pickups/cars/scooters. Mad innit! Meantime I’m doing the no-dig thick, cardboard + layer of manure and compost method.
I’ll try this tasty looking recipe as i have a bag of chia seeds doing nothing, thanks.
Yes, those illustrations are from me. I made them when I first started recording and photographing this whole bale gardening process. Glad you liked them!
We happen to use hay bales, rather than straw… does that help any? Not that there are tons of meadows around in Greece, but maybe now, in the spring, you might find some? But I guess that also depends what part of the country you are in now.
We had five bales of straw delivered this afternoon! We will arrange them this weekend, I hope and then start them cooking. Thanks for all the advice
Yayy! Good luck and keep me up to date with your progress. What will you be planting?